Features
- Entry-/Exit- Implementation.
- Synchronous-/Asynchronous- Mode.
- Perfect to realize the behavior of embedded systems.
- UML-statechart-applicability.
- Use of transitions-tables to define the hierarchical structure.
- Great overview of all states because every state is represented with a separate class.
- Each state is TDD-testable.
- Full flexible due to state-logic-implementation in Do()-method.
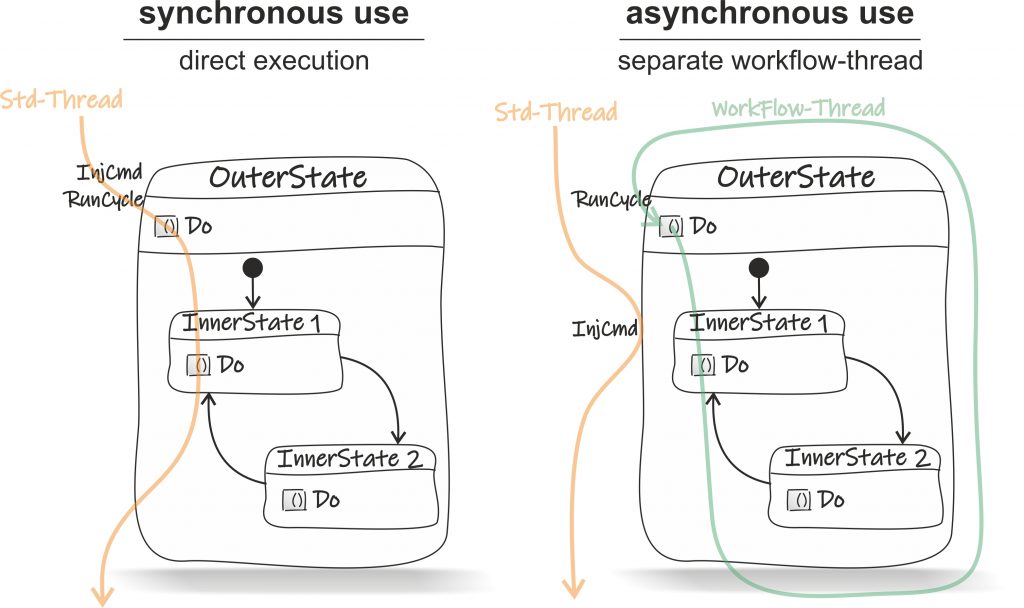
- Command-injection can be accomplished from any thread.
- Variable-injection provides clarity and great testability.
- States can be designed for reusability.
- Supports Done-Flag-Pattern.
- Current-state-restoring using state-paths.
- Simple to learn :-).
Quick Start
class InnerState1 : State
{
    private int counter;

    protected override void Entry()
    {
        /*Do some stuff here, which should run once
         a transition to this state occurs*/
        this.counter = 0;
        base.Entry();
    }
    protected override Enum Do()
    {
        /*This method is excuted on every RunCycle
         as long as this state is the active one.
         Returns a transition for switching to another state*/
        if (this.counter++ >= 5)
            return Transitions.Transition1;
        return base.Do();
    }
    protected override void Exit()
    {
        /*Here you can do some cleanup,
         which run before a transition to
         another state happens*/
        base.Exit();
    }
}
class InnerState2 : State
{
    private int counter;

    protected override void Entry()
    {
        /*Do some stuff here, which should run once
         a transition to this state occurs*/
        this.counter = 0;
        base.Entry();
    }
    protected override Enum Do()
    {
        /*This method is excuted on every RunCycle
         as long as this state is the active one.
         Returns a transition for switching to another state*/
        if (this.counter++ >= 99)
            return Transitions.Transition2;
        return base.Do();
    }
    protected override void Exit()
    {
        /*Here you can do some cleanup,
         which run before a transition to
         another state happens*/
        base.Exit();
    }
}
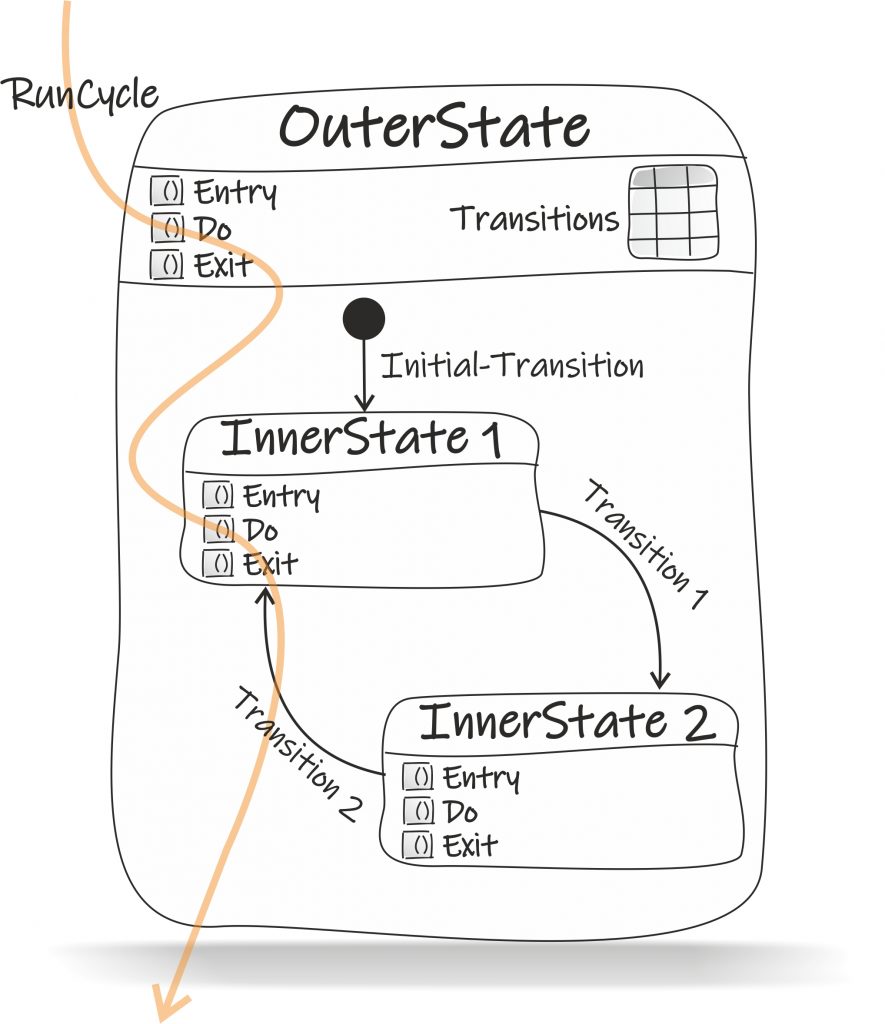
class OuterState : State
{
    public override TransitionsTable TransitionsTable
    {
        get => new TransitionsTable {
        //Initialtransition which should endup to InnerState 1
        new TransitionEntry{
            Transition=Transitions.Initial,
            StateType=typeof(InnerState1),
            StateName="InnerState 1"},
        //Transition 1, which should endup to InnerState 2
        new TransitionEntry{
            Transition=Transitions.Transition1,
            StateType=typeof(InnerState2),
            StateName="Innerstate 2"},
        //Transition 2, which should endup to InnerState 1
        new TransitionEntry{
            Transition=Transitions.Transition2,
            StateType=typeof(InnerState1),
            StateName="Innerstate 1"},
        };
    }

    protected override void Entry()
    {
        /*Do some stuff here, which should run once
         a transition to this state occurs*/
        base.Entry();
    }
    protected override Enum Do()
    {
        /*This method is excuted on every RunCycle
         if this state is the active one*/
        return base.Do();
    }
    protected override void Exit()
    {
        /*Here you can do some cleanup,
         which run before a transition to
         another state happens*/
        base.Exit();
    }
}
OuterState outerState = new OuterState();
outerState.RunCycle();
Installation
EMSm is available on NuGet. Open the package console and type:
PM> Install-Package EMSm
Or right-click your project -> Manage NuGet Packages… -> Online -> search for EMSm
Introduction
EMSm is a lightweight, easy-to-implement but powerfull hierarchical state machine library which is written in C#. The Library is built as .Net 2.1 Standard Library and super-usable with .Net Core. Therefore it is very suitable for developing the behavior of your embedded systems.
Due to its architecture, the state machine workflow is fully isolated from the state-logic-implementation. As a consequence it is possible to unit test each state separately.
Tutorial
Source available on https://github.com/EdotMdot/EMSm
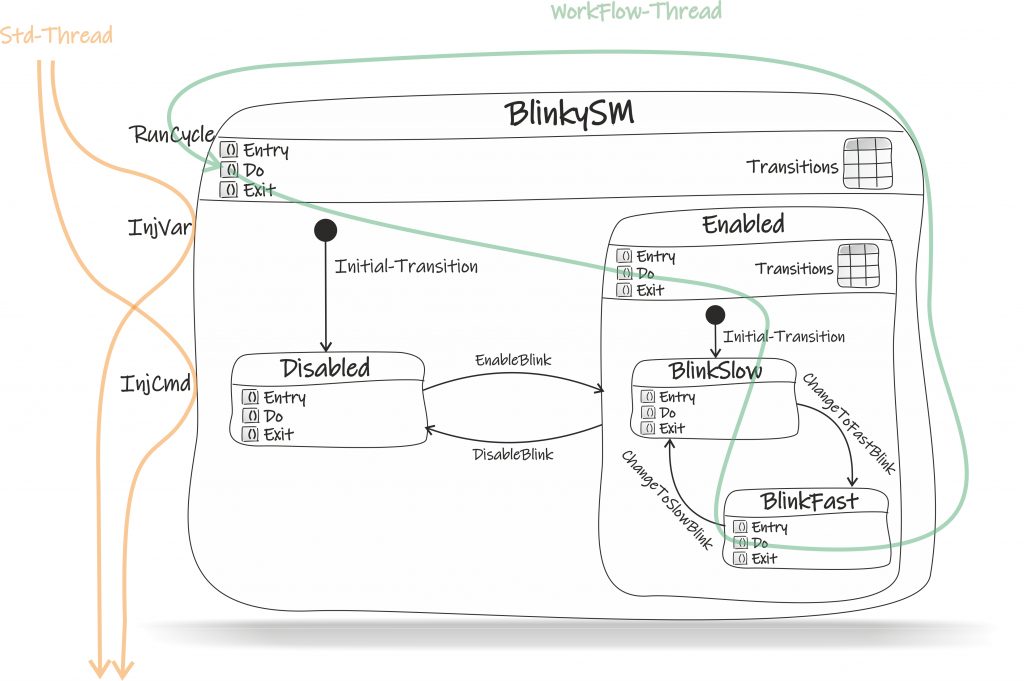
Let me introduce you this fabulous Blinky-Machine:
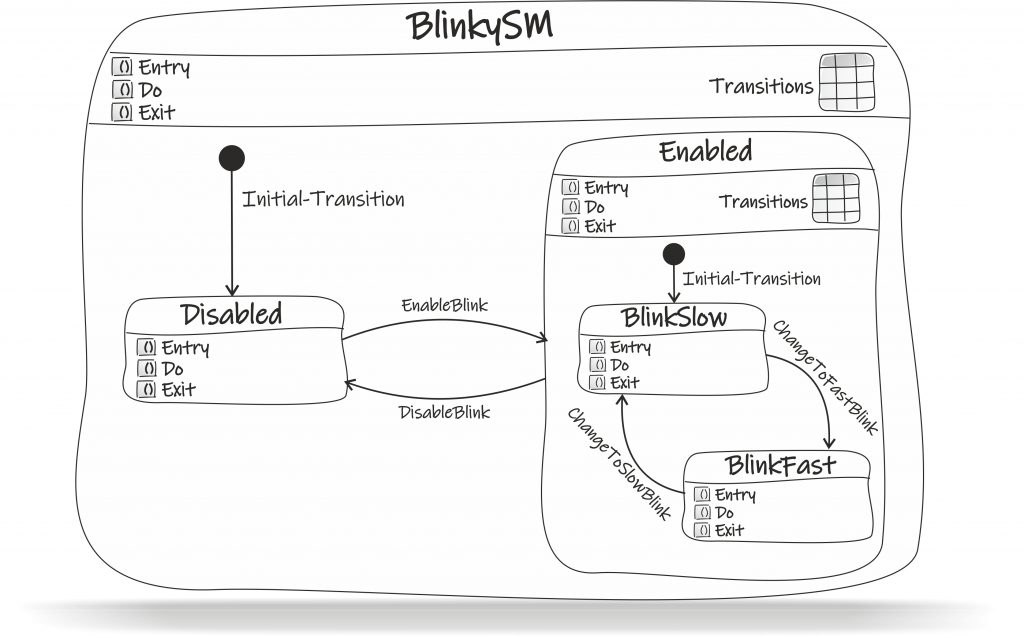
Remarkable is that the Enabled-State and the Disabled-state, in turn, are inner states of the BlinkySM-State. The BlinkySM-state is the root state of the state machine. It is the outermost state in the hierarchy.
In
Let’s implement this Blinky-Machine using the EMSm-Library:
Enabled-/Disabled state
First, you create the states:
class BlinkySMState : State
{
}

class DisabledState : State
{
}

class EnabledState : State
{
}
… override the Do()-method to implement the state-logic:
class DisabledState : State
{
    protected override Enum Do()
    {
        if (this.GetCommand<BlinkySMCommands>() == BlinkySMCommands.Enable)
            return BlinkySMTransitions.EnableBlink;

        return base.Do();
    }
}
The Do()-method of the Disabled-state checks whether the Enable-command is received, or not.
As soon as the Enable-command is received, the Do()-method returns with the EnableCommandReceived-transition.
Add a similar implementation for the Enabled-state:
class EnabledState : State
{
    protected override Enum Do()
    {
        if (this.GetCommand<BlinkySMCommands>() == BlinkySMCommands.Disable)
            return BlinkySMTransitions.DisableBlink;

        return base.Do();
    }
}
It is worth noting that the Do()-method returns transitions and not states. So the states do not have to know about other states and are thereby decoupled from each other.
Next, define the transitions, simply as an Enum: (please be sure that an Initial-transition exists)
enum BlinkySMTransitions
{
    Initial,
    EnableBlink,
    DisableBlink,
}
… then define the commands, also as an Enum: (be sure that a None-command exists. None as the first enum-entry is the default-command if no command was injected.
enum BlinkySMCommands
{
    None,
    Enable,
    Disable,
}
Finally, we define which transition ends up to which state. We do this by overriding the Transitionstable-property of the BlinkySM-state:
class BlinkySMState : State
 {
     public override TransitionsTable TransitionsTable
     {
         get => new TransitionsTable {
         new TransitionEntry{
             Transition=BlinkySMTransitions.Initial,
             StateType=typeof(DisabledState),
             StateName="Disabled"},
         new TransitionEntry{
             Transition=BlinkySMTransitions.EnableBlink,
             StateType=typeof(EnabledState),
             StateName="Enabled"},
         new TransitionEntry{
             Transition=BlinkySMTransitions.DisableBlink,
             StateType=typeof(DisabledState),
             StateName="Disabled"},
         };
     }
 }
The transitions-table provides the structure of the inner state-machine. Each TransitionEntry-item defines which state should be active after a specific transition occurs. Additionally, a name for the state is defined, which gives us the chance to reuse one state multiple times. The Enabled-state with the name “Enabled”, for example, should be active when the EnableCommandReceived-transition occurs.
Congratulations, you have

Instantiating the root state BlinkySMState and executing that RunCycle()-Method continuously
BlinkySMState blinkySM = new BlinkySMState();

while (true)
{
    Thread.Sleep(100);
    blinkySM.RunCycle();
}
Each state implements the InjectCommand()-method. With this, you can send commands to the state machine. An injected command remains available for the actual active state and its active inner-states during one run-cycle.
blinkySM.InjectCommand(BlinkySMCommands.Enable);

blinkySM.InjectCommand(BlinkySMCommands.Disable);
Dadaaaa, now you can run the Blinky-Machine. You can enable and disable it.
Well, since the Blinky-Machine should toggle a lamp, you may want to implement the two inner states BlinkySlow and BlinkyFast.
BlinkySlow-/BlinkyFast- state
Same procedure as before, first create the states:
class BlinkSlowState : State
{
}

class BlinkFastState : State
{
}
… override the Do()-method and implement the state-logic.
class BlinkSlowState : State
{
    protected override Enum Do()
    {
        if (this.GetCommand<EnabledStateCommands>() == EnabledStateCommands.ToggleBlinkSpeed)
            return EnabledStateTransitions.ChangeToFastBlink;

        return base.Do();
    }
}

class BlinkFastState : State
{
    protected override Enum Do()
    {
        if (this.GetCommand<EnabledStateCommands>() == EnabledStateCommands.ToggleBlinkSpeed)
            return EnabledStateTransitions.ChangeToSlowBlink;

        return base.Do();
    }
}
… define the transitions and commands:
enum EnabledStateCommands
{
    None,
    ToggleBlinkSpeed,
}

enum EnabledStateTransitions
{
    Initial,
    ChangeToSlowBlink,
    ChangeToFastBlink,
}
Of course, you could add the ToggleBlinkSpeed-command and the ChangeBlinkSpeedToSlowBlink-/ ChangeBlinkSpeedToFastBlink-transition to the existing BlinkySMCommands-/ BlinkySMTransitions– enums. For the sake of clarity, it is always an excellent way to create command-/ transition-enums for each inner state machine.
You see, it’s quite the same as on Enabled-/ Disabled-state. By interpreting the ToggleBlinkSpeed-command, the corresponding transition is returned.
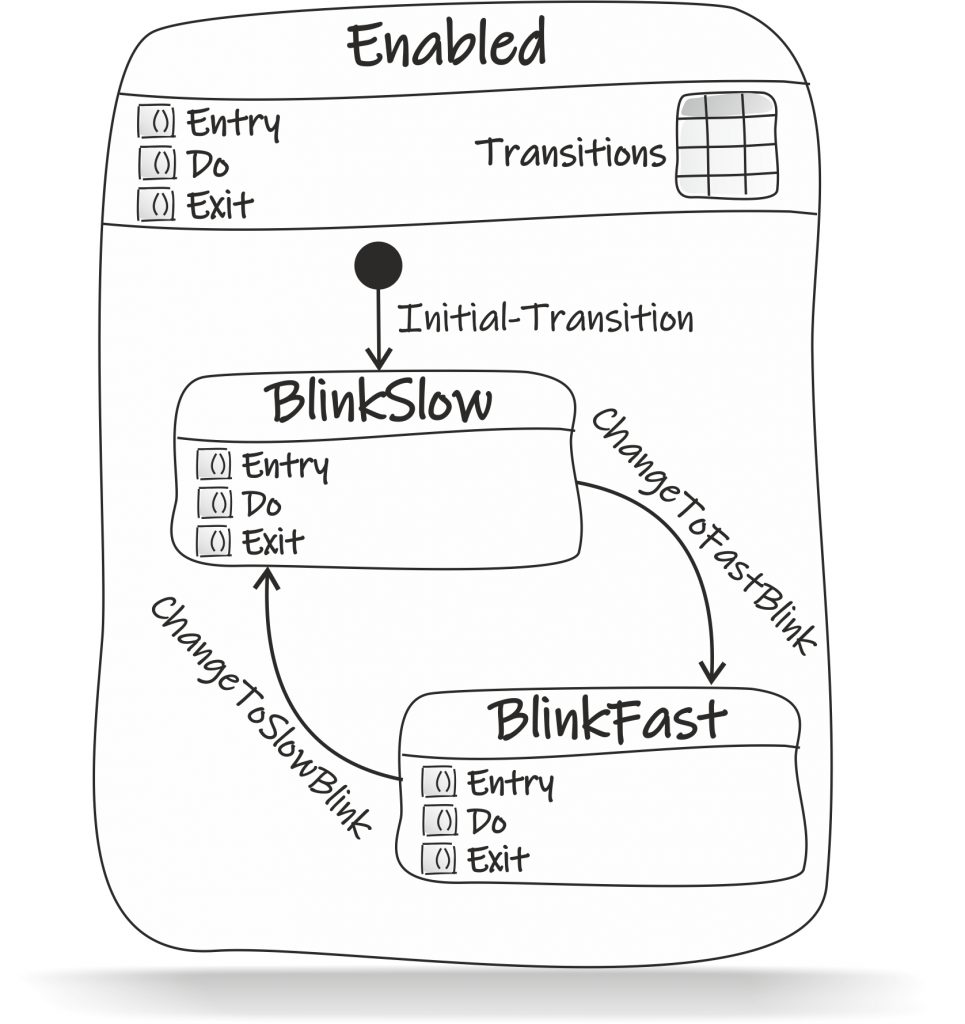
Finally, add a transition-table to the Enabled-state by overriding the Transitionstable-property.
class EnabledState : State
{
    public override TransitionsTable TransitionsTable
    {
        get => new TransitionsTable {
        new TransitionEntry{
            Transition=EnabledStateTransitions.Initial,
            StateType=typeof(BlinkSlowState),
            StateName="BlinkSlow"},
        new TransitionEntry{
            Transition=EnabledStateTransitions.ChangeToFastBlink,
            StateType=typeof(BlinkFastState),
            StateName="BlinkFast"},
        new TransitionEntry{
            Transition=EnabledStateTransitions.ChangeToSlowBlink,
            StateType=typeof(BlinkSlowState),
            StateName="BlinkSlow"},
        };
    }

    protected override Enum Do()
    {
        if (this.GetCommand<BlinkySMCommands>() == BlinkySMCommands.Disable)
            return BlinkySMTransitions.DisableBlink;

        return base.Do();
    }
}
You have created the inner-state-machine of the Enabled-state. Now it is time to let the lamp blink.
Assume that the lamp is switched on or off by setting a GPIO (general-purpose-input-output) to true or to false. So you need such a GPIO-object with which you can accomplish these tasks.
class GPIO
{
    private bool lamp = false;
    public bool Lamp
    {
        get => this.lamp;
        set
        {
            this.lamp = value;
            if (this.lamp)
                Console.WriteLine("Lamp switched on");
            else
                Console.WriteLine("Lamp switched off");
        }
    }

    public void ToggleLamp()
    {
        this.Lamp = !this.Lamp;
    }
}
//create GPIO-Handler (general purpose input/output): With this object the lamp is controlled.
GPIO gpio = new GPIO();
_blinkySM.InjectVar("gpio", gpio);
Use the InjectVar()-method to make the
Once a variable is injected into a state, this state and its inner states have access to it, using the GetVar()-method:
this.GetVar<GPIO>("gpio").ToggleLamp();
Next, create a timer-object for blink-interval-timing and inject it into the BlinkySM-state:
//create Timer-Object for workflow-timing
Stopwatch timer = new Stopwatch();
_blinkySM.InjectVar("timer", timer);
With these two variables you are able to implement the state-logic for the BlinkSlow-/BlinkFast– state:
class BlinkSlowState : State
{
    private const int IntervalTime = 5000;

    protected override void Entry()
    {
        this.GetVar<Stopwatch>("timer").Start();
        base.Entry();
    }

    protected override Enum Do()
    {
        if (this.GetVar<Stopwatch>("timer").ElapsedMilliseconds >= IntervalTime)
        {
            this.GetVar<Stopwatch>("timer").Restart();
            this.GetVar<GPIO>("gpio").ToggleLamp();
        }

        if (this.GetCommand<EnabledStateCommands>() == EnabledStateCommands.ToggleBlinkSpeed)
            return EnabledStateTransitions.ChangeToFastBlink;

        return base.Do();
    }
}

class BlinkFastState : State
{
    private const int IntervalTime = 1000;

    protected override void Entry()
    {
        this.GetVar<Stopwatch>("timer").Start();
        base.Entry();
    }

    protected override Enum Do()
    {
        if (this.GetVar<Stopwatch>("timer").ElapsedMilliseconds >= IntervalTime)
        {
            this.GetVar<Stopwatch>("timer").Restart();
            this.GetVar<GPIO>("gpio").ToggleLamp();
        }

        if (this.GetCommand<EnabledStateCommands>() == EnabledStateCommands.ToggleBlinkSpeed)
            return EnabledStateTransitions.ChangeToSlowBlink;

        return base.Do();
    }
}
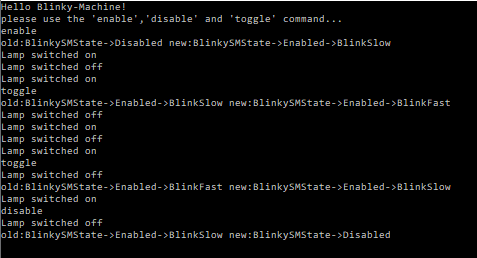
Get the example from https://github.com/EdotMdot/EMSm, type in the console window ‘enable’ ‘disable’ or ‘toggle’ to control the Blinky-Machine:
And now: the workflow:
On startup, the Disabled-state is the active one; it’s the initial state of the state machine.
Now let’s assume that you send an enable-command, by hitting an “Enable”-button, for example, a transition from Disabled– to the Enabled-state occurs.
As you can see, the Enable-state contains two inner states: the BlinkSlow-state (initial state) and the BlinkFast-state. These states have both transitions to each other.
With a second button called “ChangeBlinkIntervall” for example, we can toggle between these two states. The BlinkSlow– and BlinkFast-state with their transitions
For more info: please refer to the reference manual